Translate

sbartist : painting in the dark Headline Animator

Showing posts with label stamping. Show all posts

Saturday, June 21, 2014

Everything is Royal in PAISLEY for #ICAD2014 Day 12


For the day 12 prompt I knew I had to use these unmounted paisley stamps from Viva Las VegaStamps! For this card I wanted to play around with some embossing powder.

Since I made a clock out of my glitter tray {it was never used anyway} – I grabbed my baggie full of embossing powders with paper plate pouring trays. In there I have these two handmade stamps I had created carved from recycled foam vegetable trays and they go nicely with the paisley stamps.


I started by selecting one of my painted cards leftover from day 5 "galaxy".


Using Globecraft and Piccolo Enamel and Embossing Powder Adhesive {which comes in a nice dauber top bottle} I applied the clear "INK" to the stamps and pressed onto my background. If you be careful about where you are placing the images and your fingers, you can stamp then apply embossing powder, then continue stamping and powdering until the background is filled – then at the end heat set the embossing powder in one fell swoop. This is what I try to do so the embossing powder doesn't get overcooked in areas.


Due to my messy way of storing my embossing powders my white and gold had each spilled out and got mixed up in the protective baggie I had them in. There was more than enough to use for a project and this is the perfect project to not let that crafty goodness go to waste. It looked like the perfect combination of salt and pepper.


I stamped the larger handmade flourishes first, then filled in with the smaller stamps. When filled I added a few hand doodled details using a Versamark marker {this is the clear ink in a pen form}. I like the results of this but the lines came out a lot thicker than I really wanted. I have a fine line detail applicator that I'm going to fill with some of the embossing liquid and give this a try again on another project. To fill in a couple leftover areas I used my tiny arrow recycle heart from Viva Las VegaStamps!; one of four stamps I've illustrated that have been immortalized in rubber at VLVS!


Here's a detail of the magic happening... on left the raw embossing powder and on the right – all it's melted golden glory! The white bits add a nice texture to the gold, but really is lost into the gold. I love those happy accidents!


I totally love how this one came out... paisley and all.
It's so regal with the purple and gold! :) Sb

+ + + + + + +

You can play along too - visit ICAD for all the details!

Wednesday, June 18, 2014

Say CHEESE!!! #ICAD2014 Day 11 - Toy Camera


For the Index Card a Day prompt for Day 11 - Toy Camera, I started with one of my extra backgrounds created from mopping up spray mists on Day 5 "Galaxy".


I started with one of my coveted and never been used stencils by The Crafter's Workshop. The Rhonda Palazzari 6x6 Stencil: TCW392s Captured is perfect for this prompt. Using my Faber-Castell big white PITT pen, I traced and filled in the main body of the camera.


I went over this a couple of times to build up the opacity on top of the misted background. When dry, I switched to the outline of the camera and filled with black PITT pen. I also added some cross-hatching for extra detail. The mini star clusters are also in the stencil. I tried to fill with the white PITT pen, but it sort of bled under and lost all detail, so I went over with a blue PITT pen {that did the same thing because of the large nib}, then used the thin black PITT pen to trace the stars proper. I really like the pop art feel the out of register colors give so I repeated it while applying the stamps I used to fill in the background. 


Some hand lettering in the style of the fonts from the stamps and this card is complete. Stamps are from Cloud Nine Design 66042 Travel Set and Heidi Swapp Arrow Stamp/Die Set HS01136. This one is so fun and I'm enjoying trying out some of my "never been used" supplies.  :) Sb

+ + + + + + +

You can play along too - visit ICAD for all the details!

Thursday, June 12, 2014

Now I Know my ABC's - #ICAD2014 Day 9 ALPHABET


For the Index Card a Day 2014 day nine prompt "alphabet", I started out by stamping with a virgin {never been inked} stamp in my stash. This is a distressed newsprint/clippings #60-0067 background by Inkadinkado. I stamped it a number of times using jet black StazOn ink - just in case I decide to add color after.


There are bits of doodles and distressed edges, swirls and visible
alpabet letters... a nice start for today's prompt theme.


Then I got out my nicely organized and ever growing stash o'washi tape. I was bad over the weekend and acquired 6 new rolls and when putting them away, I came across two others that were hiding in my tool tote. The words "GET" and "FUN" are clipped out of the newspaper from my puzzle hunt the other day.

The "Just Flying By" is clipped from the stamp storage box that I'm storing my ICAD cards in. I got a bunch of these empty Stampin' Up storage boxes at a crafty yard sale. They are great to hold crafty supplies to be taken on the go.


I had fun mixing, matching and clipping out words to spell out
fun phrases – "Get Out a Happy Smile" and "Love fun Time!" :) Sb

+ + + + + + +

You can play along too - visit ICAD for all the details!

Thursday, June 5, 2014

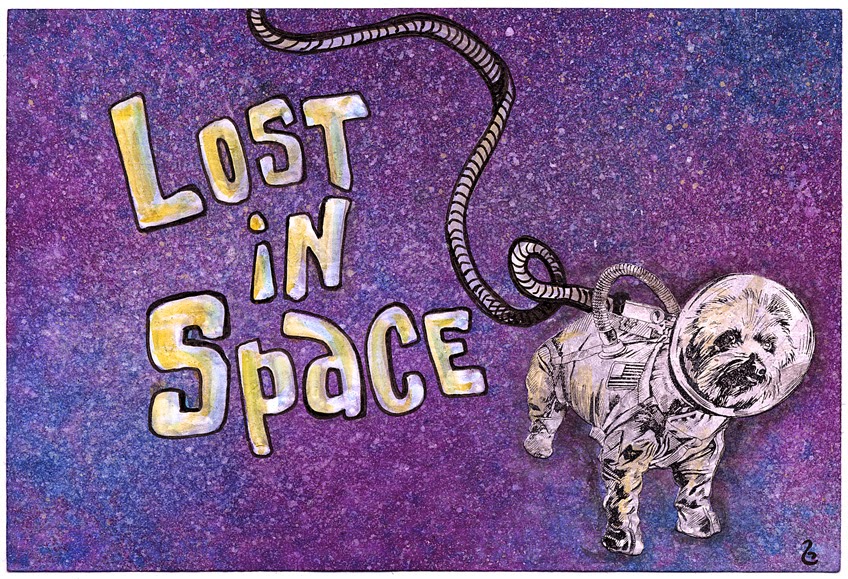
LOST in SPACE for #ICAD2014 Day 5 - Galaxy


Hello again! I'm playing with my somewhat small mis-matched collection of spray mists for the day 5 prompt of ICAD2014 – GALAXY. The photo above is how I clean my sprayers after use. I prop them all upside-down in a small container with warm water to keep them from clogging. I have to say my favorite colors are the handful of Ditto misters I picked up on clearance one day at the craft store.


I brought out my makeshift spray cloth {a recycled dry cleaning bag} to cover my white counter tops so that I may commence spraying. I misted the front and back of my index card with water first to minimize warping as I add colors.


I added a couple sprays of purple, royal blue, teal, pink and denim blue mists to create outer space... super fast and EASY. I did not mop up the colors off the plastic.


Then using Picket Fence Ranger Distress Stain with an old stiff paintbrush I flicked layers of white "STARS" onto my galaxy scene. This required a couple of passes as the whole background was drying – as the white would soak in to the other colors. This was OK because it added to the depth and realistic look.


Here's my finished background before any embellishing.


Now what to do with all this PRECIOUS misted goodness!!?


Pick up the paint on all these papers. Nothing goest to waste here! I started with four {4} more index cards and still had quite a lot of ink left. So I went and got some larger sections of paper {that are approx. 8" x 12"}. This did the trick and I have these new background papers ready to go. 


I have the perfect stamp to embellish this card to make it complete... this terrier in space from Viva Las VegaStamps! stamped with Black StazOn ink on gloss cardstock rubbed with Brushed Pewter Ranger Distress Stains. I fussy cut the space dog out and then hand-doodled in the type and a cord to keep my pooch from floating away. This one is so fun! :) Sb

+ + + + + + +

You can play along too - visit ICAD for all the details!
"Art must be indescribable and inimitable..." – Pierre Auguste Renoir

Please Observe the Fine Print...

All Photos & Designs displayed on this blog are copyright ©2007-2018 Susan M. Brown/sbartist or the artist or company credited in the post. Please do not use images or designs without written permission...message all requests to sbartist1107 at yahoo {dot} com. Thank You & Think GREEN : )